
If the internet is to be believed, the best way to build endurance is to train hard, collapse in a pool of sweat, and really feel like you’ve given your all. Ultimately, this must be “real” training, right? Putting it all out there every time? Not exactly. When we reference the 100-plus-year history of endurance training, we see a different story. The use of high intensity is actually rather rare in a properly structured endurance training plan. So when (and how) do wise coaches and smart athletes add high-intensity training to their programs?
We know for a fact that high-intensity aerobic training (Zone 3 and above) is most effective when the athlete has a sufficiently strong basic aerobic capacity. But how much aerobic capacity is sufficient?
The answer is simple: when you’ve raised your Aerobic Threshold to be within 10 percent of your Lactate Threshold, as measured by either heart rate or pace. With more than a 10 percent spread between thresholds, an athlete has what we refer to as Aerobic Deficiency Syndrome (ADS) and that athlete will benefit the most by developing their aerobic base. Those who have less than a 10 percent spread between thresholds will need to shift most Z2 workouts down to Z1 while beginning to add Z3 and Z4 workouts. These athletes are in a position now to maximally benefit from higher-intensity work.
If you have not done so, please read our article on ADS first.
The 10 Percent Test
The 10 percent test will help you determine if you are aerobically deficient or if you have a sufficient basic aerobic capacity to allow you to add high-intensity training. To do this test, first determine your Aerobic Threshold (AeT), then determine your Anaerobic Threshold (AnT) or Lactate Threshold.
AeT Test
- Option 1: Heart rate drift, which allows you to retest frequently and best of all is free.
- Option 2: Lab test, as explained here and here.
AnT or Lactate Threshold Test
- Explained here.
Once you have these two important metabolic events identified, calculate the percentage difference between your Aerobic Threshold heart rate and your Lactate Threshold heart rate by dividing the higher heart rate by the lower heart rate. We know this is not a conventional way to calculate percentage, but it works well for our purposes. Example: Suppose a lab test determines that your AeT heart rate is 128, and your AnT/LT hill climb test shows an average heart rate of 150. 150/128 = 1.17. Your AnT/LT heart rate is 17 percent greater than your AeT heart rate.
We want to see a spread of less than 10 percent before we begin to add intensity into the training program. In the example above, you would still have a lot of potential to improve your aerobic base with Z1–Z2 workouts and should not be too eager to add Z3 or higher-intensity work just yet. We often see spreads of 30 percent. Elite endurance athletes can have a spread of 5–7 percent, or only 10 beats.
Sample Results
Here is what this looks like graphically if we were testing blood lactate:
Athlete with Low Aerobic Capacity
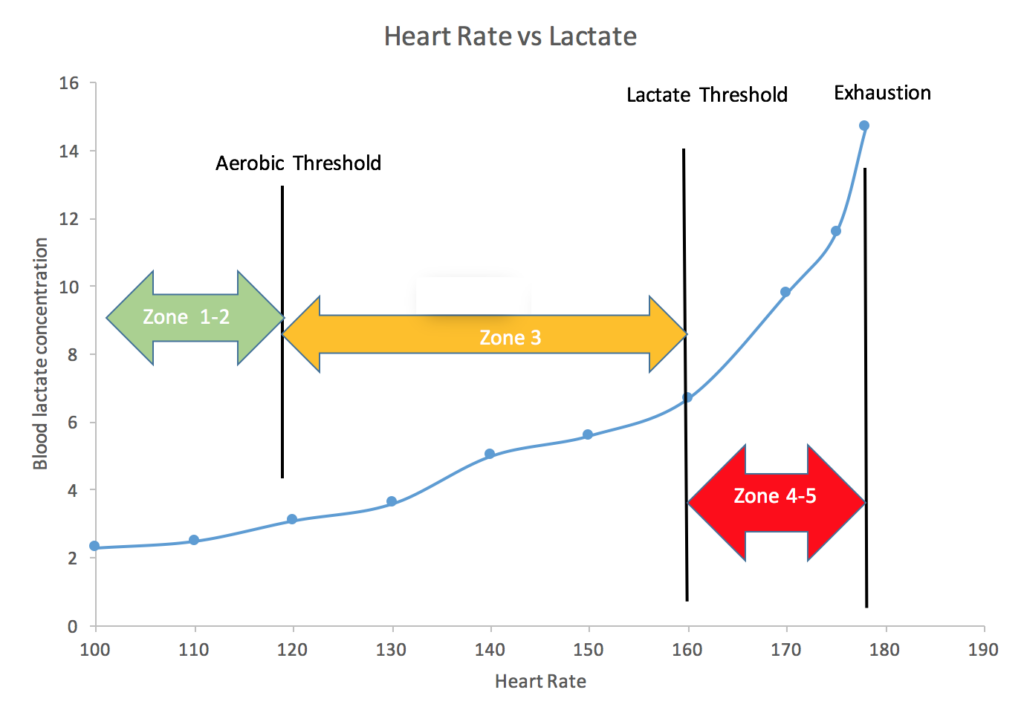
The results of a blood lactate test for an athlete with low aerobic capacity. At the top of the basic aerobic zones (Z1 and Z2), his AeT occurs at a heart rate of around 120 bpm and a running pace of about 10 minutes/mile (6:12 min/km). At the top of Z3, his AnT/LT, at 160 bpm, corresponds to a pace of 8:20 minutes/mile (5:10 min/km). With a 40-beat spread between thresholds, this athlete has Aerobic Deficiency Syndrome and needs to do considerable aerobic base work.
Athlete with High Aerobic Capacity
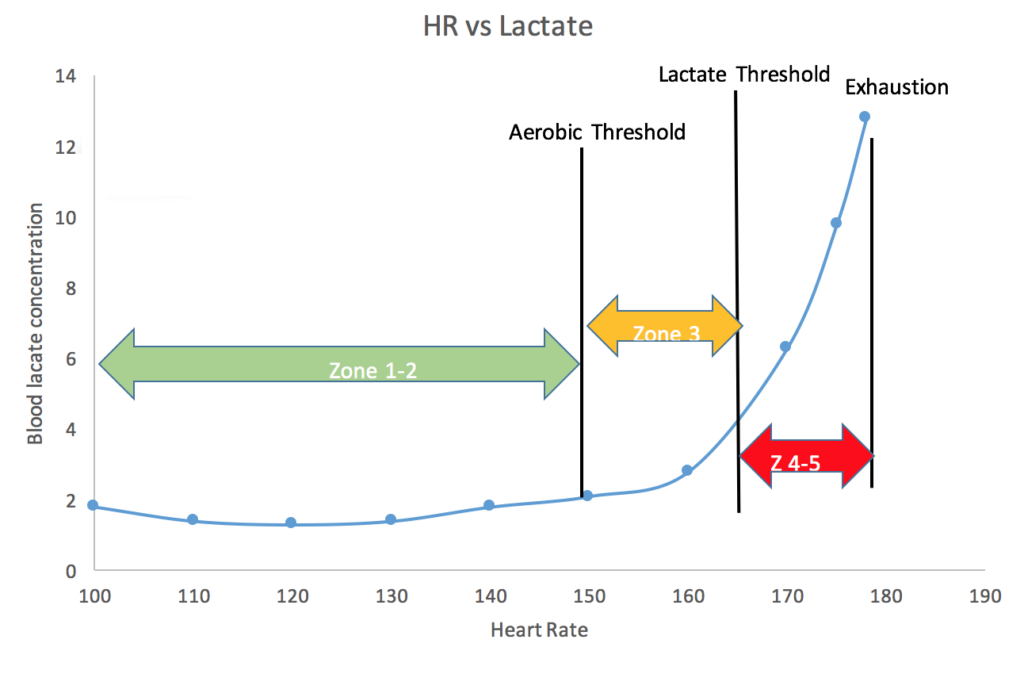
The results of a blood lactate test for the same athlete after a season of proper training. The graph shows a large increase in aerobic capacity. Notice that the AeT has moved up to 150 bpm, corresponding to a pace of 8:15 minutes/mile (5:09 min/km), and the AnT/LT has bumped to 165 bpm—the 10 percent spread we are looking for—and a pace of 7:30 minutes/mile (4:40 min/km). In this condition, this same athlete can now sustain a pace for several hours that he previously struggled to maintain for a single hour.
As demonstrated in these two graphs, the athlete dramatically increased his basic aerobic capacity with focused Z1–Z2 training for several months. To raise your AeT means stubbornly training at and below AeT heart rate, as boring as that may feel, and it means adhering to that during ALL aerobic workouts, even climbs. The biggest stimulus to aerobic capacity is the frequency and duration of this low-to-moderate-intensity work, which causes muscle glycogen store depletion and signals a bunch of aerobic adaptations.
Depending on your genetics and the volume of training, after a few weeks you’ll start to see that you are moving faster and easier at the same heart rate. That’s a good time to do another AeT test to see how much it has moved. Be advised, though: Both your AeT and AnT/LT will move up and down the heart rate scale depending on your recovery state. Neither one is fixed, and it is best to test them in a fairly rested condition.
It's Time to Add Intensity—Now What?
Once the gap between AeT and AnT/LT has narrowed to under 10 percent, you will need to reduce your time in Z2 by doing more Z1 work and introducing some Z3 and/or Z4 workouts. It might seem counterintuitive that the fitter athlete needs to train easier than the less fit, but here’s why: The fitter person is moving much faster at AeT. This faster Z2 training imposes a much higher neuromuscular load and associated fatigue. For the very fit, too much training in Z2 will lead to overtraining.
The solution is that the fitter you are, the more polarized your training intensity needs to become. Easy days need to be easy so that hard days can be hard. Training in the middle too much will make the easy days too hard and the hard days too easy. See this article for more about this situation. There are entire books written on high-intensity training and we can only scratch the surface of the subject in the space of an article.
Why High-Intensity Training?
Wait, what about our constantly beating the low-intensity aerobic base drum? Are we changing our tune now? Not at all. High intensity plays a critical role in every endurance athlete’s training. Our message remains that this high-intensity work comes as a supplement to and not a replacement for the aerobic base work. This higher-intensity work stands atop the aerobic base to maximize endurance performance. How do you decide how to add intensity to your program? What type, how much, how often, for how long? There are a lot of things to consider, so let’s try to navigate the maze.
High-Intensity Specificity
A good general rule is that the high-intensity training should be as event specific as possible. This means it should, in most ways, model the endurance demands of your event. For skimo and running, this means running/skiing fast on uphill grades similar to the event you are training for. For alpinists and mountaineers, this means hiking steeply uphill or doing a moderate climb, usually with a weighted pack. Speed is important for the skier and runner, so the tempo needs to be similar to the event/race and not slow, grinding work. For the climber, the high-intensity speed can be a slow grind, but there is also a benefit to training at tempos faster than you would move in actual climbing situations. (See the photo of Steve that leads this article.)
Guidelines and Sample Intensity Workouts
How much volume? How often and how hard? How much rest, and is it active or passive rest? These are all variables to consider when planning high-intensity workouts that are intended to improve endurance. I’m paraphrasing Per Astrand, one of the giants of 20th-century exercise science, here: “It is unclear whether endurance is more effectively improved by doing 4×4 minutes at 95 percent of max heart rate or 2×16 minutes at 85 percent of max heart rate.” In other words, should you be doing several short, very hard repetitions or fewer longer and more moderate ones? He tried to answer this in the 1960s and ’70s to no avail. Exercise scientists are still trying to answer this and there is still no definitive answer.
In general, when you read about precise interval workout prescriptions you are reading about someone’s pet training—something they used that seemed to produce good results. But at its core this simply means going hard for a while then resting for a while and repeating that several times. The range of possibilities for high-intensity (Z3 to Z4) endurance training is almost unlimited and can run the gamut from 10 seconds hard followed by 10 seconds easy for 30 minutes at Z4 effort all the way up to 1×60 minutes continuous in Z3 for a well-trained athlete, and everything in between. We explain how to build your own intensity session below.

Steve House sprinting through Smith Rock State Park while training for his 2009 attempt on Makulu.
The Dirty Dozen Tips
- The interval style of workout is the most common for Z3 and Z4 training.
Z3 is typically done with long (15-to-60-minute) work periods and short recovery intervals with a work-to-rest ratio of 4:1 or 5:1—for example, a 10-minute work period followed by a 2-to-2.5-minute recovery interval. (That’s right, the term “interval” is correctly used to designate the rest interval between work periods.) - For Z3, implement a work-to-rest ratio of 4:1 or 5:1.
- With Z4, the work periods get shorter.
For Z4 work of 4 minutes and less, use rest intervals of the same length as the work period—a 1:1 work-to-rest ratio. - For work periods longer than 5 minutes, use a work-to-rest ratio of 2:1.
Keeping the rest interval relatively short keeps the aerobic system revved up. If you use too long of a recovery interval, the work period can shift to a more anaerobic training effect. - Begin with 5 percent of your weekly aerobic volume.
Total volume of high intensity is a very individual thing and depends almost entirely on an athlete’s training history. An easy way to gauge how much you can and should use is to start with a total work time of about 5 percent of your weekly aerobic volume and see how you handle it from a recovery standpoint. - Keep up the low intensity.
You should not decrease your low-intensity aerobic work as you add intensity to your weeks. If you are forced to cut basic aerobic support volume, then you’re adding too much intensity too soon and need to cut back on the next intensity workout. - Start with Z3.
Start by adding Z3 work into your weeks a little at a time, using rules 5 and 6 to decide how much. It might be 1×10 minutes of Z3 the first week. As you get stronger, you’ll tolerate more and will be able to up the volume. Ten percent of the weekly volume done at high intensity is quite a lot of hard work for even well-trained individuals. - Only add volume as you can handle it.
Only add more intensity when you can comfortably handle the current load. Once up to about 10 percent of the total weekly volume in Z3, you should consider replacing some of the Z3 with Z4. Replace 2 minutes of Z3 with 1 minute of Z4. Again, only add volume as you can handle it. - Don’t be a slave to the plan.
You need to be rested enough to put out the required effort and speed for the full duration of each interval. Otherwise these hard workouts will not achieve their desired effect. - Space high-intensity workouts 48 to 72 hours apart.
At least 48 hours—and preferably 72. - Be sure that the easy days are easy enough so that the hard days can be hard enough.
- Rest when you are tired.
This work has a powerful training effect but it can quickly push one over the overtraining cliff if you do not keep your easy volume high.
Alpinist or Mountaineer Intensity Workout
Once the above preconditions have been met, high-intensity workouts like the one in the title photo are a very effective tool. See this article for a complete description.
If your hill is shorter than, say, 1,000 feet vertical, just break this workout into an interval session. The downhill recoveries will be longer than ideal, but these are the real-world compromises we must make sometimes. Another option for the vertically challenged is to do this on a stair machine. An hour of accumulated vertical is a big workout of this type so proceed gradually to get a feel for it.
Mountain Runner or Ski Mountaineer Intensity Workout
Because mountain runners and skimo racers move at a quicker tempo and with less resistance in their events, the intensity should more closely model the specific speed and gradients they will be on.
Warm-up
Perform a 15-to-20-minute run or ski, gradually building the intensity during the last 5 minutes so that the final 2 minutes are done in Z3. This will ensure that you are well warmed up and your aerobic metabolism is firing on all cylinders. Then perform 2–3×15-to-20-second accelerations up your hill, taking a 2-minute active recovery between.
Sample Beginner Z3 Workout
2×15 minutes uphill at Z3 intensity with 3–4 minutes of active recovery between repetitions. Follow the body of the workout with a 20-minute Z1 run/ski.
Sample Advanced Z3 Workout
3×20 minutes uphill at Z3 intensity with 5 minutes of active recovery between repetitions. Follow the body of the workout with a 20-minute Z1 run/ski.
Sample Beginner Z4 Interval Workout
3×3 minutes uphill at Z4 intensity with 3 minutes of active recovery between repetitions. Follow the body of the workout with a 20-minute Z1 run/ski.
Sample Advanced Z4 Interval Workout
4×8 minutes uphill at Z4 intensity with 3 minutes of active recovery between repetitions. Follow the body of the workout with a 20-minute Z1 run/ski.